The Edge Gateway is the physical or virtual agent that runs on your factory floor. It acts as the local data collector, processor, and buffer between your industrial assets and the Central Server.
Why use Gateways?
- Network Segmentation: Keep your OT network isolated from the cloud. The Gateway acts as a secure bridge.
- Protocol Translation: Convert diverse industrial protocols (Siemens, Modbus, OPC UA, etc.) into a unified internal format.
- Data Buffering: In case of network failure, the Gateway caches data locally and forwards it when the connection is restored (Store-and-Forward).
Gateway Types
Every Proxus installation starts with a default gateway, but you can scale to thousands of remote locations.
- SYSTEM Gateway (ID 1): Created automatically during installation. It is co-located with the Central Server (running in the same Docker network). It is used for internal system tasks or local data ingestion.
- Remote Gateways (ID 2+): These are the agents you deploy to remote industrial PCs (IPCs), servers, or VMs near your machines.
Deploying a Remote Gateway
To deploy a gateway to a remote Linux machine (with Docker installed), follow these steps:
Create Gateway Record
- Navigate to Data Management > Edge Gateways in the Management Console.
- Click New.
- Name it (e.g., "Factory A - Line 1") and click Save.
Configure Deployment
- Click on the newly created gateway to open the Detail View.
- Click the "Deploy to Edge" button at the top of the screen.
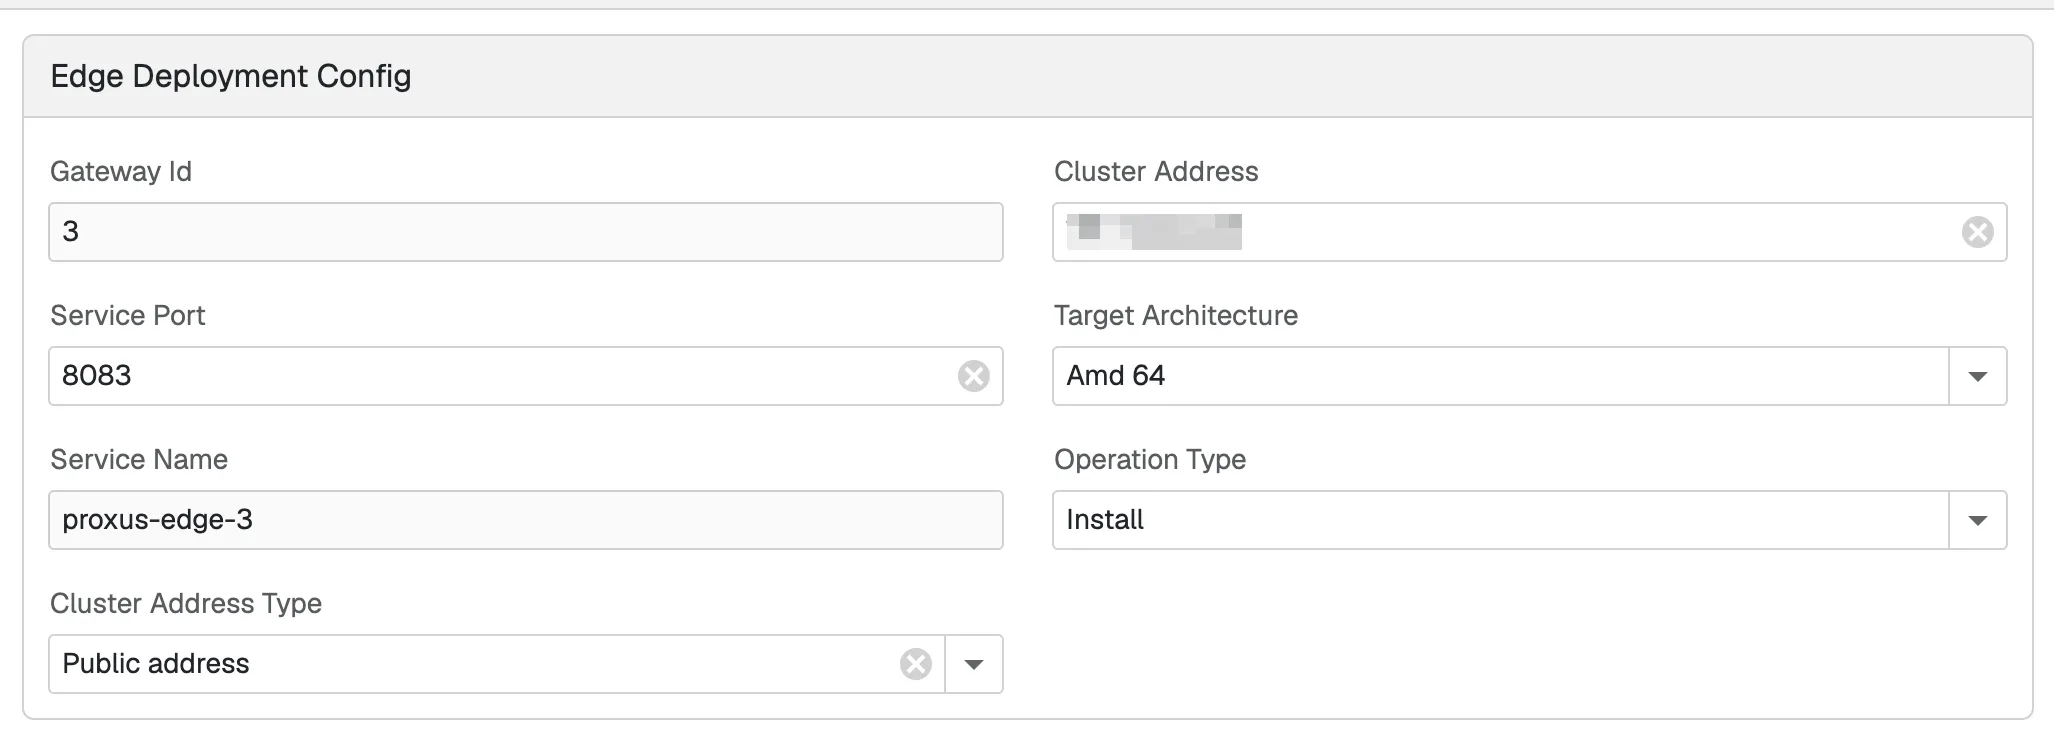
- A configuration dialog will appear. Here you can adjust parameters like:
- Cluster Address Type: Decide how the server address is resolved.
LocalAddressonly works when the edge host can reach the server's local IP. For remote, VPN, NAT, or multi-subnet deployments, prefer a routable or DNS-based address. - Cluster Address: The exact address the gateway should call back to. Double-check that it matches the selected type and network path.
- Service Port: The port the gateway service will listen on (default:
8083). - Target Architecture: Select based on your hardware (e.g.,
Amd 64orArm 64).
- Cluster Address Type: Decide how the server address is resolved.
Run the Command
- Copy the generated Command from the dialog.
- Log in to your remote Linux machine (ensure Docker is installed).
- Paste and run the command (it starts with
sudo sh -s <<'SH').
The first crop shows the dialog as a whole, with the fields that usually matter most for remote installs.
- LocalAddress only works when the edge host can reach the server's local IP.
- For remote, VPN, NAT, or multi-subnet deployments, use a routable or DNS address instead of relying on LocalAddress.
- If the hub is not reachable on the NATS leaf port, the gateway will stay disconnected even if the UI loads. The edge stack needs the hub's leaf listener on 7422.
- Keep the target host ports free: 8083 for the edge service and 1883 for the embedded MQTT broker.
- If your server sits behind a firewall or reverse proxy, check both the address and the port.
This close-up shows the field that usually decides whether a remote deployment works or not.

- Use Deploy to Edge for a gateway that will run on another machine. The local SYSTEM gateway is already installed with the server.
- Make sure the Cluster Address is reachable from the target machine.
- Keep the selected Target Architecture aligned with the real CPU of the target host.
- Use a free Service Port on the target machine.
- Treat the generated command as tied to this gateway record. If you change the gateway name, address, or architecture, generate the command again.
The deployment command prepares the target machine automatically:
- Writes the gateway files the edge service needs.
- Sets up the local configuration for this gateway record.
- Starts the edge service container with Docker Compose.
- Connects the gateway back to the Central Server using the values you selected in the dialog.
Verify Connection
Once the script finishes, return to the Management Console. The gateway status should turn Green (Online), showing real-time CPU, memory, and disk diagnostics.
What To Check If It Does Not Connect
If the gateway stays disconnected after deployment, check these first:
- The target machine can reach the Central Server address you selected in the dialog.
- The hub's leaf-node port (7422 by default) is reachable from the target machine.
- The port you chose for the gateway is not already in use on the target host.
- The gateway architecture matches the host CPU.
- The gateway machine can reach the broker and server network without firewall, VPN, or NAT blocks.
Go back to Data Management > Edge Gateways, open the gateway record, and confirm that the status becomes Connected and the last seen time updates.
Configure the NATS connection and EdgeGateway identity via the NATS and Edge Gateway sections in Proxus-config.toml.
Having Trouble?
If your gateway is not connecting or shows unexpected behavior, see Gateway Not Connecting or MQTT Broker Issues.